5. FCM tutorial
In this section you will learn about:
Incorporating modifications to your suite
Creating a ticket to document your code change
Creating a branch using the FCM GUI and command line
How to checkout and change a working copy
Getting information about your working copy and branch
Committing changes to your branch
Version control of suites
5.1. Setting up your default text editor
When you attempt to create a branch or commit changes to the repository, you will normally be prompted to edit your commit log message using a text editor. The system chooses its editor by searching for a non-empty string through a hierarchy of environment variables in this order: SVN_EDITOR, VISUAL, and EDITOR.
The editor you select must able to run in the foreground. The default editor is vi. If you prefer to use emacs or nedit, for example, you can add one of the following in your $HOME/.profile, $HOME/.kshrc (Korn) or $HOME/.bashrc (Bash):
# Emacs
export SVN_EDITOR=emacs

# NEdit
export SVN_EDITOR='nedit'
5.2. Applying modifications to a UM suite
Now that you’ve run a basic suite, you need to know how to apply changes to the trunk code. We’ll start by applying existing changes (aka a branch) to your suite. A branch equates to a copy of the UM source code tree with user modifications. A branch can contain changes to many code files.
As a user, you will be supplied with the URL and possibly a version number of a branch. FCM keywords can be used to specify the URL which is a way of using shorthand for standard bits of the URL path. For example, this branch has been created in the MOSRS UM repository:
https://code.metoffice.gov.uk/svn/um/main/branches/dev/rosalynhatcher/vn13.0_training_um_shell1
A shorter way to specify this is:
fcm:um.x-br/dev/rosalynhatcher/vn13.0_training_um_shell1
This branch contains a code change to um_shell to print:
Tutorial Change: Start of UM RUN Job: instead of Start of UM RUN job:
To add this branch go to the panel fcm_make –> env –> sources and click the + button next to um_sources to add a new branch URL:
branches/dev/rosalynhatcher/vn13.0_training_um_shell1
Now Save your suite and then submit it either by running rose suite-run or clicking the “Play” button in the rose edit GUI.
When the suite has completed, check the job.out file to verify that you have got the changed output message:
Tutorial Change: Start of UM RUN Job: instead of Start of UM RUN job:
5.3. Opening a Ticket
All code changes destined for the UM trunk must have an associated Trac Ticket documenting the change (e.g. https://code.metoffice.gov.uk/trac/um/ticket/1957). For all other changes creating a ticket to document your change is entirely optional.
Note
For full details on the UM working practices including the review and commit to trunk process please see https://code.metoffice.gov.uk/trac/um/wiki/working_practices. If you are planning to make a code change intended for the trunk please make sure you read this before starting the change.
We will now create a ticket for our code change. Navigate to the UM Trac page on MOSRS: https://code.metoffice.gov.uk/trac/um (You will be prompted to login to MOSRS if you haven’t already done so). Click on New Ticket. A form entitled Create New Ticket should appear. For the purposes of this tutorial fill in the following:
Summary: “Code change for UM Tutorial”
Description: provide as much detail as possible so that all reading the ticket are able to understand the planned change. You can use WikiFormatting to enhance the readability of your text.
Type: select “task”
Milestone: select “Not for Builds”; this indicates the ticket is not intended for the UM trunk. If your change is intended for the trunk this should be set to the UM release the change is being targeted at: e.g. “UM13.0 code release”
Severity: leave this as “minor”
Component: select “General”
cc: leave this empty
Owner: assign the ticket to yourself by selecting your username from the drop down list.
A preview of your ticket should appear at the bottom of the page. If if doesn’t appear automatically, use the Preview button to inspect your ticket before clicking Create ticket button to create the ticket.
Remember the number of your new ticket as you will need it later in this tutorial.
5.4. Making Code Changes
The default text editor for entering commit messages is vi. If you would prefer to use a different editor; for example emacs or vim, please see the section on “Setting up your default text editor”.
Creating a branch
Firstly create a new directory (e.g. um/branches) in your $HOME directory on PUMA2 which will be your work area and cd to it.
Create a new branch by running the command:
fcm branch-create -k <ticket> <branch_name> fcm:um.x-tr@vn13.0
Where:
<ticket>- is the related Trac ticket number for the ticket you created earlier.<branch_name>- is a short name for the branch. This must contain only alpha-numeric characters and/or underscores; e.gtutorial
You will be prompted to edit the message log file. A standard template is automatically supplied and pops up in your default text editor. Add a comment about what the branch is for at the top of the file. When you are ready, save your change and exit the editor. Answer y when you are prompted to go ahead and create the branch.
If the branch is created successfully you will get a message similar to the following:
Committed revision 113820.
[info] Created: https://code.metoffice.gov.uk/svn/um/main/branches/dev/rosalynhatcher/vn13.0_tutorial
The branch will have a URL (location in repository) like this:
https://code.metoffice.gov.uk/um/main/branches/dev/[userid]/vn13.0_[branch_name]
By default FCM prepends the revision of the trunk you have branched from to your branch name. Here, as we have used version labelling it is vn13.0. If you had entered a version number instead of a label FCM would have added rxxx where xxx is the revision number instead.
Note
For further information on the options available for branch creation type: fcm branch-create --help
Take a note of the revision number the branch was created at, and the branch name, vn13.0_[branch_name].
You can see your branch from within the MOSRS Trac (https://code.metoffice.gov.uk/trac/um): Click on Browse Source on the Trac menu bar and then navigate through main –> branches –> dev–> [userid]
Your branch will also appear in the UM repository mirror held on PUMA2 (within 5 minutes)
Making changes to a working copy
Checking out a working copy
You may have noticed that creating a branch does not create a source code tree that you can edit (working copy)! To do this you need to checkout your branch. Make sure you have changed to the working directory you created earlier as by default code is checked out to the current directory. To checkout a copy of the UM code type:
fcm checkout URL
Where URL is the url of your branch. This can be supplied in its full form:
https://code.metoffice.gov.uk/svn/um/main/branches/dev/[userid]/vn13.0_[branch_name]
or by a shorter way:
fcm:um.x-br/dev/[userid]/vn13.0_[branch_name]
Note
In the second form we have replaced the leading part of the Subversion URL
https://code.metoffice.gov.uk/um/main/brancheswith the FCM repository keywordfcm:um.x-br. Keywords are shortcuts to save you from having to type in the full URL.As we have not specified a local directory PATH in the checkout command, it will create a working copy in your current working directory, using the basename of the URL you are checking out. For example, when you checkout the branch you have just created, the command should create the working copy in
$PWD/vn13.0_[branch_name]. Make a note of the location of your working copy, in case you forget where you have put it.We are also not specifying a revision to checkout, so it will checkout the
HEAD, i.e. the latest revision.
Changing code
Back in the work area directory you created at the beginning of branch creation you should now see that a new directory has appeared and that it is named the same as your branch. This is your working copy. cd into this directory and explore the code structure to familiarise yourself with how the code is structured.
Now make some code changes! Use the following scenario to take you through the basic method of changing, adding and deleting files:
Change to the
src/control/top_level/sub-directory in your working copy.Edit
um_shell.F90, using your favourite editorGo to the line that says
CALL umPrint('I am PE '//TRIM(str(mype))//' on '//TRIM(env_myhost),Change:
'I am PE'to'Hello World PE'Go to the line that says
of UM RUN Job :Change:
of UM RUN Job :toof UM Tutorial RUN Job:Save your changes and Exit the editor
Adding a new file
Still in the
src/control/top_leveldirectory, add a new FORTRAN module fileum_training_mod.F90containing a subroutine calledum_training_sub().
Hint
An example file is available on PUMA2:
~um1/um-training/um_training_mod.F90.The routine
umPrintshould be used for writing out messages rather than standard FORTRANWRITEstatements.
Run
fcm addon the command line, to let the repository know you’re adding a new file at the next commit. Make sure you are still insrc/control/top_leveland then type:fcm add um_training_mod.F90
at the command prompt.
Modify
um_shell.F90to use this new module. You’ll see lots ofUSEstatements near the top of the file. Add the following to use our new one.USE um_training_mod
Then add a line to call the
um_training_subsubroutine (suggest around line 903 within theum_Shell_bannersubroutine):CALL um_training_sub()
Deleting a file
In the
fcm-make/ncas-xc30-ifortdirectory, you should see a fileum-createbc-safe.cfgRun
fcm deleteon the command line, to let the repository know you want to remove this file from your branch: Make sure you are infcm-make/ncas-xc30-ifortand then type:fcm delete um-createbc-safe.cfg
Getting information about changes to a working copy
All the changes you have made so far have not been committed - i.e. saved to your branch in the repository. It is possible to list these changes using the fcm status command. Firstly, make sure you cd back up to the top level of your working directory and then type:
fcm status
and you should see a list of files that have been changed. If you’ve followed the example scenario above you should see output similar to this:
ros@puma2$ fcm status
D       fcm-make/ncas-xc30-ifort/um-createbc-safe.cfg
M       src/control/top_level/um_shell.F90
A       src/control/top_level/um_training_mod.F90
Notice that each changed file is flagged with a letter that indicates what the change was: A for Added, D for Deleted and M for Modified.
Reverting an uncommitted change
At this point you can undo any changes before committing. Try the following so that you know how to restore a changed file:
Edit
src/control/top_level/initial_4A.F90to make any change and then save it.Run
fcm statusagain to confirm it has been flagged as Modified.Run
fcm reverton the command line: Make sure you are still insrc/control/top_leveland then typefcm revert initial_4A.F90Re-run
fcm statusto see that the file is no longer modified.
Note that fcm revert will undo ALL changes to a file relative to your branch. Therefore if you’ve made several uncommitted changes, fcm revert will undo them all, not just the last one.
Committing changes
The change in your working copy remains local until you commit it to the repository where it becomes permanent. If you are planning to make a large number of changes, you are encouraged to commit regularly to your branch at appropriate intervals. Make sure you are in the top level directory of the working copy and then type:
puma2$ fcm commit
A text editor will appear to allow you to edit the commit message. You must add a commit message to describe your change above the line that says --Add your commit message ABOVE - do not alter this line or those below--. Your commit will fail if you do not enter a commit message. Make sure you provide meaningful commit messages (if your change is intended for inclusion in the trunk you should reference your ticket number) as these will show up in the revision logs and can be a useful source of informtion.
Tip
DO:
Put a link to the ticket that raises the issues you are addressing using a wiki syntax; e.g.
#15. Putting this as the first item in the commit message means it will show very clearly under Trac what ticket the change relates to.State the reason for the change
List possible impacts to other users
Use wiki syntax that can be displayed nicely in plain text
DON’T:
Repeat what’s already stated in the merge template; e.g. statements such as
merge my branch to the trunkshould be avoidedList the files you have changed. This will already have been included in the commit log by FCM
Use wiki syntax that cannot be displayed nicely in plain text
Be vague. A commit message that just says
Fixis insufficient!
Save your change and exit the editor. Answer y when you are prompted to confirm the commit.
If you’ve followed the example scenario above you should see output similar to this:
ros@puma2$ fcm commit
[info] vi: starting commit message editor...
Change summary:
---------------------------------------------------------------------------
[Root   : https://code.metoffice.gov.uk/svn/um]
[Project: main]
[Branch : branches/dev/rosalynhatcher/vn13.0_tutorial]
[Sub-dir: ]

D       fcm-make/ncas-xc30-ifort/um-createbc-safe.cfg
M       src/control/top_level/um_shell.F90
A       src/control/top_level/um_training_mod.F90
---------------------------------------------------------------------------
Commit message is as follows:
---------------------------------------------------------------------------
#7107 Testing FCM Tutorial
---------------------------------------------------------------------------
Would you like to commit this change?
Enter "y" or "n" (or just press <return> for "n"): y
Deleting       fcm-make/ncas-xc30-ifort/um-createbc-safe.cfg
Sending        src/control/top_level/um_shell.F90
Adding         src/control/top_level/um_training_mod.F90
Transmitting file data ..done
Committing transaction...
Committed revision 113821.
Updating '.':
At revision 113821.
Getting information about your branch
If you need to find out information about your (or another user’s) branches, you can use the fcm branch info command.
In the directory where you checked out the code, type:
puma2$ fcm branch-info
You should see information about your branch revision, when it was last changed and the parent it was created from:
ros@puma2$ fcm branch-info
URL: https://code.metoffice.gov.uk/svn/um/main/branches/dev/rosalynhatcher/vn13.0_tutorial
Repository Root: https://code.metoffice.gov.uk/svn/um
Revision: 113821
Last Changed Author: rosalynhatcher
Last Changed Rev: 113821
Last Changed Date: 2022-11-18T10:44:16.243200Z
----------------------------------------------------------------------------
Branch Create Author: rosalynhatcher
Branch Create Rev: 113820
Branch Create Date: 2022-11-18 10:33:08 +0000 (Fri, 18 Nov 2022)
 ---------------------------------------------------------------------------
Branch Parent: https://code.metoffice.gov.uk/svn/um/main/trunk@111272
Merges Avail From Parent: 113812 113786 ....... 111763 111761 111757 111726
Merges Avail Into Parent: 113821
Testing that your branch works
Now that you have made a branch you can use it in the suite you were running earlier. Go back to the section where you added an existing branch to your suite and add your new branch as well.
Save and then Run your suite.
If you have followed the tutorial scenario so far you should find that your suite fails during the fcm extract of code. In the job.err file for the fcm_make task you will see an error message like this:
[FAIL] um/src/control/top_level/um_shell.F90: merge results in conflict
[FAIL]     merge output: /home/ros/cylc-run/u-cc519-test/share/fcm_make/
.fcm-make/extract/merge/um/src/control/top_level/um_shell.F90.diff
[FAIL]     source from location  0: svn://puma2.archer2.ac.uk/um.xm_svn/main/trunk/src/
control/top_level/um_shell.F90@111272
[FAIL]     source from location  1: svn://puma2.archer2.ac.uk/um.xm_svn/main/branches/
dev/rosalynhatcher/vn13.0_training_um_shell1/src/control/top_level/
um_shell.F90@113821
[FAIL] !!! source from location  2: svn://puma2.archer2.ac.uk/um.xm_svn/main/branches/
dev/rosalynhatcher/vn13.0_tutorial/src/control/top_level/
um_shell.F90@113821
This is because the sample branch and your branch contain modifications to the same line in file um_shell.F90 and so conflict. Errors like this can be quite common if you are working with others on the same section of code. The default behaviour of FCM in this situation is to fail and force you to resolve the conflict. For the purposes of this exercise we will simply remove the um_shell1 branch from the suite and rerun it - we’ve decided we only want the changes we’ve put in our branch. In practice you will need to go through the process of resolving a conflict which can be quite complex. There is a tutorial dedicated to conflict resolution should you wish to know more and is a good reference should you encounter conflicts in your development work.
Check that you can see the changed print statements and that the subroutine
um_training_subwas called.
Hint
Remember not all run output is in the job.out or job.err files. You may need to look in the pe_output directory too.
Viewing your changes in Trac
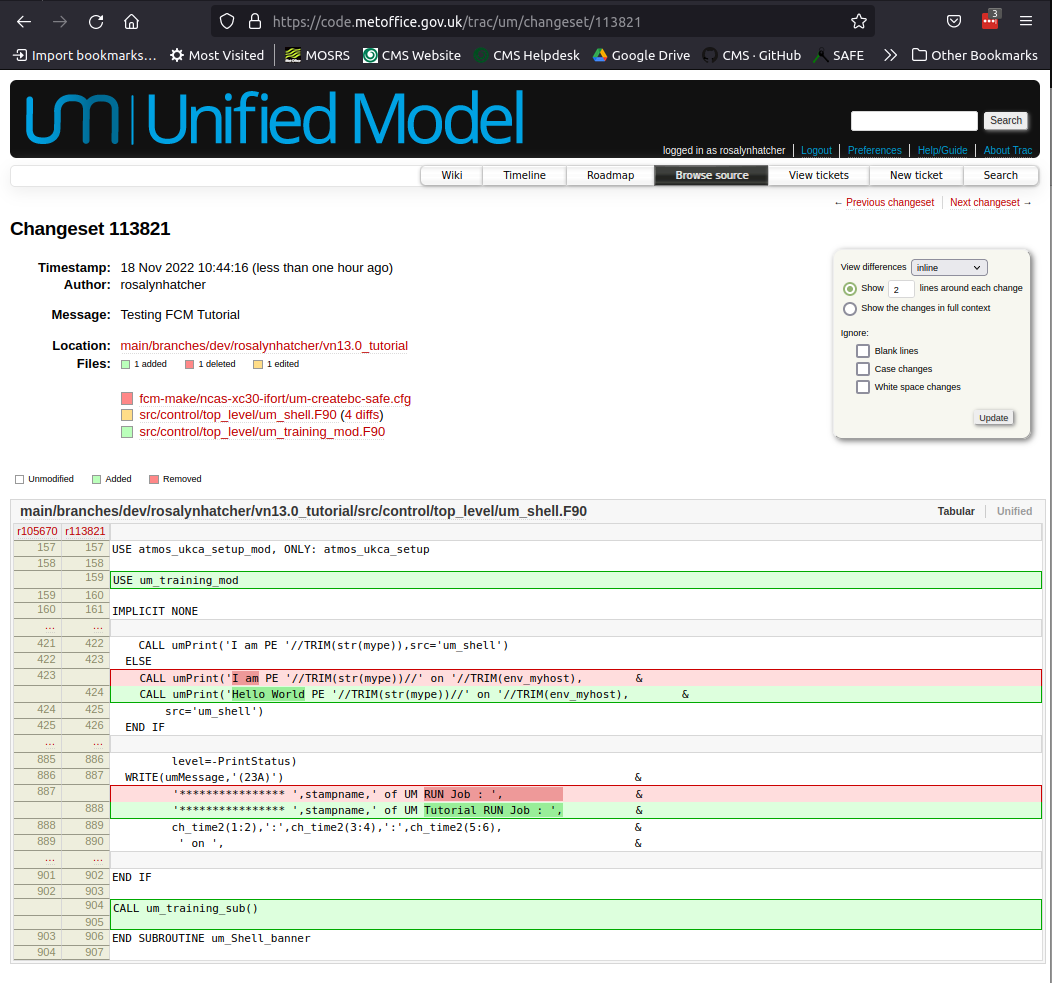
Making a change to your branch results in a changeset which is basically a record of the changes. One way of viewing the changeset you have just created is to click on Timeline in Trac. The Timeline view is a sequential record of all events in the repository. Near the top, you should see changesets for the creation of your branch, and the subsequent commit for the code changes you made. The changesets are numbered corresponding to the revision of your branch which would have been displayed in the GUI when you did a fcm commit or `fcm branch info. To see all the details click on the line ‘Changeset[xxx]…’ relating to your changeset. Alternatively, if you enter the number of the changeset “[xxx]” into the search box at the top right, it will take you directly to the numbered changeset. Your changeset should look something like this:
5.5. Documenting your change
Go back to the Trac ticket you created for your code change and add some documentation as follows:
- Add a link to your branch:Development branch:
[source:main/branches/dev/<username>/<branch_name>] A description of what code has changed
Test results (i.e. Did your suite run? Were there any clashes to resolve?)
Any other information you want to add
As we have finished the change for this tutorial example we will resolve the ticket as fixed by clicking Modify Ticket` and selecting resolve & assign to <username> as fixed.
Preview and Submit your ticket to save the changes. Check the link you added works.
5.6. Tidying Up
If your development is destined for the UM trunk, then once you have finished your code changes and it has been tested and reviewed, your branch will be committed to the project shared package branch by the project owner. Once this has been done and there are no problems, your branch is essentially redundant. If no other users are using this branch in their suites it can be deleted.
For the purposes of this tutorial, you can now proceed to delete your branch. When you delete a branch, it becomes invisible from the HEAD revision, but will continue to exist in the repository should you want to refer to it in the future.
List branches owned by you
If you forget what your branch is called and/or what other branches you have created, you can get a listing of all the branches you have created in a project. To do this use the following command:
fcm branch-list URL
Where URL is the name of repository you want to search. In this case it would be fcm:um.x
Delete a branch
Make sure you are in the relevant working copy directory and type:
fcm branch-delete
You will be prompted to edit the commit message file. Again a standard template is automatically supplied for the commit. Add your commit message, save your changes and exit the editor.
Answer y when you are prompted to go ahead and delete this branch.
Your working copy is now pointing to a branch that no longer exists at the HEAD revision of the repository. It is possible to keep this working copy, create a new branch and switch your working copy to point to the new branch. Otherwise, you can remove your working copy by issuing a careful rm -rf command.
5.7. Version Control of Suites
Just like the model code, your UM suites are also under version control in a subversion repository called roses-u which is on the MOSRS. Once you have a working copy of your suite under ~/roses you can use FCM commands in the same way as for your source code branches; i.e. commit changes, diff changes, etc.
Look in the roses-u repository via MOSRS Trac (https://code.metoffice.gov.uk/trac/roses-u) and find the suite you created in the previous section.
Hint
Go to Browse Source` then drill down to find your suite. e.g. u-cc519 would be under c/c/5/1/9
When was the suite last modified?
Go to your suite working directory and type
fcm statusto see the changes you have made since you copied the suite.Run
fcm committo commit your changes to the repository.Look again in the MOSRS roses-u Trac and see that your commit has now appeared in the repository. What is the suite’s last modified time now?
Use Trac to view the changes you have made to the suite.
Hint
Click on the number in the revision column, and then on the View changes button to show a diff of your changes